Now my FMP has been completed i can now Post this and see what my audience thinks about it. My next blog will be their feedback on what they think about my short film.
Category: Production Skills
Shoot 3, 4 and 5 Effects – Explained
When creating this effects i also looked back on my Losses Blog where is talk about how i can create an interesting bullet whole effect. I used this knowledge with the Shaun of the Dead blog to create a whole in a person effect. I aslo made the action sequences look over the top and not realist. I explain this more in my reception theory blog. This was to make the audience wonder weather or not the action sequences where real or fake.
Shoot 3, 4 and 5 Effects – Sorting out footage + Editing my first imagination sequence
Shoot 2 Basket Ball – Sorting out footage + Editing my first imagination sequence
Shoot 1 Interview – Explained
I also forgot to mention that the fast pace of the interview was inspired buy my Shaun of the Dead research done in my Reception Theory blog
Shoot 1 Interview – Editing

Firstly i started off by Placing all clips into the timeline and then putting them all together to create a rough draft. Whilst i was doing this i was also sinking up the audio recording to the clips so that i have better audio. (the audio dialogue is the green boxes underneath the clips)
I also added some markers where i know where my effects need to be placed. This is to help me find where i need to place them easily without sifting through the timeline.
I also had a safety clip where if anything went wrong in the first few takes i have a good take that i can use to replace the bad take ( what you can see on the left of the time line)
The last step i did in this screen shot was a basic log colour correction. This is to flatten out all the clips so that i can easily change the colours throughout the project without doing each clip individually.

Here i changed the colour theme to a bit darker and more realistic because this is a good way to portray comedy.
I then added sound effects to make everything feel more real and more like a short film. This is just a basic edited version but for now it works. I now need to film and edit my action sequences and place them in where the markers are.
Audio
From my reception theory blog i wanted to show the audience that they went back in time thought the use of sound.I used a warping sound effect here because it was the closest thing i could film to a travelling sound. I also added bass sound and pulsing to drag this out, making us think that the device he used to go back in time is powering down.
Problem
A problem that i faced when i just finished my interview segment is that i have broken the 180 degree rule.
What is the 180 degree rule:
”The 180–degree rule is a cinematography guideline that states that two characters in a scene should maintain the same left/right relationship to one another. When the camera passes over the invisible axis connecting the two subjects, it is called crossing the line and the shot becomes what is called a reverse angle.”
In my project I realized that in the interview the camera angles are different and should be the same both side. but they weren’t. I tried flipping one side of the clips around but it didn’t work. So I make the shots have the same focal point and it kinda works. You’re eyes aren’t looking around trying to find the characters, I showed my teacher and he said it works in a weird way. So I decided to keep it like this and export it as a draft.
Ref:
Indie Film Hustle. (2019). 180 Degree Rule – Understand the. [online] Available at: https://indiefilmhustle.com/180-degree-rule/ [Accessed 10 Jun. 2019].
Shoot 1 Interview – Sorting out footage and Location shots
Shoot 1 Interview – Location Test Shots
From the research, i did on Location Spotting i needed to see if this location was suitable.
So I new that this location was going to turn out extremely well. I even asked one of my actors if i could frame up some test shot so that i have a rough idea on what my shot list will look like. So I now need to create a Location Recce. Know i need to create a shot list and then work on a call sheet ext…
Interview – Story Board

Between the imagination sequences, it’s going to cut back to the interview room looking at the interviewer and his exprestion this is going to repeat for each imagination sequence. I am going to explain this in more detail in my next blog…
Storyboard – First 3 Imagination Sequences
The first 3 imagination sequences
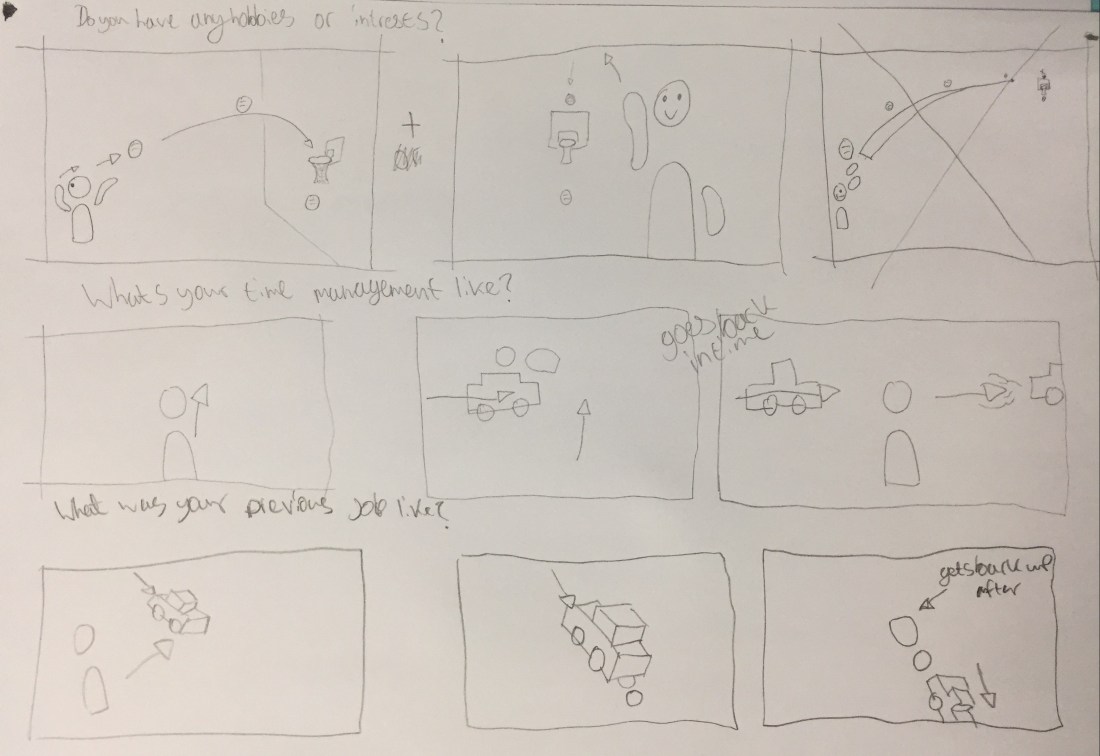
This is going off of my other audiance chosen effects. Just by when i asked them to answer a questionnaire and then i created a question to go with each effect. Know i have all my effect given story boards i can now start my storyboard for my interview scene.
